
RPI3b+ (Headless) running PostgreSQL instance on localhost for longer term data retention (Part 1)
Motivation
I have been collecting my daughter’s pulse oximeter data for almost two years. She is 24-hour ventilator dependent and my wife and I have had some close calls where she has stopped breathing. Initially, the only way we could see her sats was to be physically in front of the pulse oximeter. Obviously, this is not a realistic option. Over the last few years, I have attemped different solutions to not only monitor her, but also to model her breathing and various health metrics. Some of those solutions were:
- php scripts through apache on a local server
- InfluxDB also on a local server and plugged into Grafana for visualization
- InfluxDB Cloud, which enabled us to monitor her remotely
I still use number 3 above to this very day:
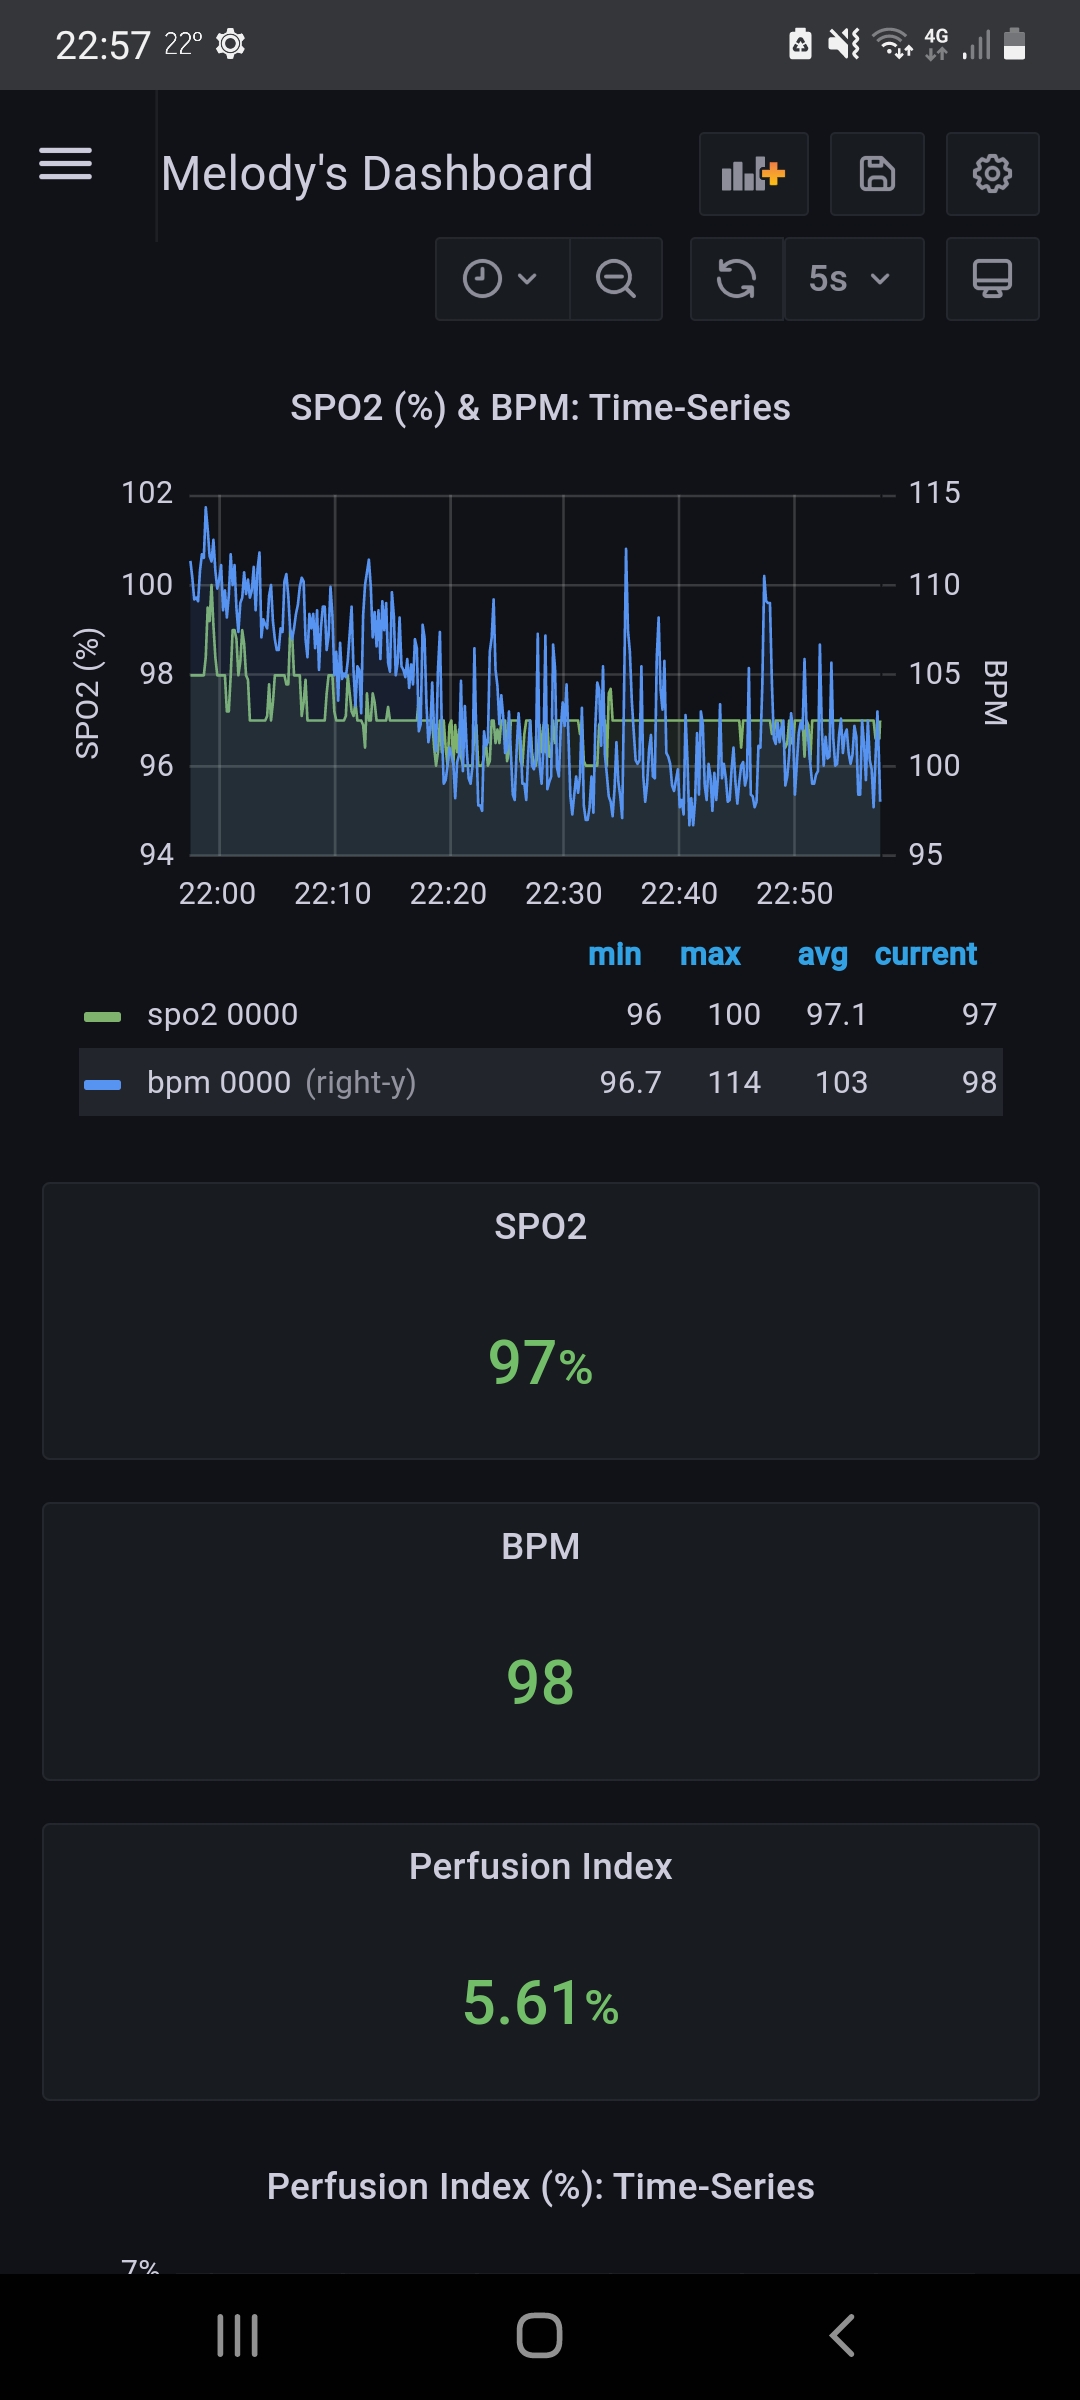
Full disclosure, I am cheap and use the hobbyist free account for both InfluxDB and Grafana which understandably comes with some limitations. One of those limitations is a 30-day data retention policy for InfluxDB. 30-days is great for real time monitoring, but what if I want to model seasonal patterns year-on-year? This is the spirit of this project. I want to capture as much historical data as possible without spending any money. I already have a spare raspberry pi 3b+ and I have an internet connection, what more do I need?
Covered in this write-up today will be:
- Downloading Raspberry Pi OS and flashing the OS to a microSD
- Activating SSH and the WIFI connection to run headless
- Remotely logging into pi to bring the system up-to-date
- Downloading and configuring postgreSQL
- Testing that configuration
Part 2 of this series will actually extract the data I have in my InfluxDB Cloud instance using the Flux query language, shape the data and push the desired data to the postgreSQL instance I will be creating today. So, let us begin…
Downloading raspberry pi OS and flashing the OS to a microSD card
I have been using raspberry pi’s for years and I cannot emphasize enough, how great they are for the price. Once ordering a board which typically costs me ~35$ US, I need to download an OS and flash that OS to a microSD card. Since I am looking to do this quickly, I am not installing anything cute like Arch or Gentoo. Raspberry Pi OS it is. The images can be downloaded here: OS Download. You will find multiple versions, in my case since I am configuring this single board computer to run headless, I do not need a GUI or any additional software (like LibreOffice, etc..) so I selected Raspberry Pi OS Lite.
Once the OS is downloaded, I change into the directory where the download was saved (in my case ~/Downloads/) and I unzip the
image using the following command: $ unzip 2021-05-07-raspios-buster-armhf-lite.zip which will uncompress a single
image. In my case, the image was named 2021-05-07-raspios-buster-armhf-lite.img.
At this stage, for the past few years, I have used balenaEtcher to flash images to microSDs: Balena Download, I have never had any issues and the software works wonderfully. Today however, I wanted to try out a USB flashed I have resident on my OS which comes installed on POP!_OS named Popsicle.:

Once the image was selected and pointed at my microSD card, I can proceed to burn the image. If I was hooking the raspberry pi up to a monitor and keyboard after the image was burned, I could go ahead and install the microSD card into my raspberry pi and skip the next section below. But, since I do not have an extra monitor and want to run headless, I will be adding a few extra files to the microSD card before I remove the microSD card from my workstation.
Activating SSH and WIFI connection to run headless
To avoid needing a monitor and a keyboard for my rpi and to make the single board computer available online to access
via SSH, I need to add 2 files to the root of /boot on the newly installed image. On my workstation, once the microSD is
mounted to my filesystem, I can change directory into /boot (the microSD card is mounted for me at /media/run/),
and touch ssh, this will create an empty file named ssh which enables ssh. The second file I need to create will be named wpa_supplicant.conf and it should be located
in the same directory, I just created the empty ssh file. The contents of this file are:
country=FR
ctrl_interface=DIR=/var/run/wpa_supplicant GROUP=netdev
update_config=1

network={
    ssid="NAME-OF-YOUR-WIFI-NETWORK"
    psk="PASSWORD-FOR-YOUR-WIFI"
}
I can save and close the above file and I am done. The microSD card can be unmounted, ejected and installed into my raspberry pi. Once the raspberry pi is plugged into a 5V power supply, and I am within range of my wifi, I should be able to ssh in using my workstation.
Remotely logging into pi to bring the system up-to-date
Once my pi is plugged in and out of the way, I can use nmap from my workstation to find out which ip address my rpi was assigned. But, first I need my inet ip address:
$ ifconfig

wlp5s0: flags=4163<UP,BROADCAST,RUNNING,MULTICAST>  mtu 1500
    inet 192.168.0.28  netmask 255.255.255.0  broadcast 192.168.0.255
    inet6 2a01:e0a:897:1680:4e48:5fa5:da96:558c  prefixlen 64  scopeid 0x0<global>
    inet6 2a01:e0a:897:1680:19f8:90c1:6834:f9e6  prefixlen 64  scopeid 0x0<global>
    inet6 fe80::3e7d:52b9:f37d:b024  prefixlen 64  scopeid 0x20<link>
    ether 74:d8:3e:01:6d:14  txqueuelen 1000  (Ethernet)
    RX packets 66847  bytes 50766070 (50.7 MB)
    RX errors 0  dropped 36  overruns 0  frame 0
    TX packets 46905  bytes 9180586 (9.1 MB)
    TX errors 0  dropped 0 overruns 0  carrier 0  collisions 0
The relevant ip address above is 192.168.0.28. Armed with this, I can now use nmap to determine my rpi’s address:
$ sudo nmap -sn 192.168.0.28/24

Starting Nmap 7.80 ( https://nmap.org ) at 2021-07-10 14:58 CEST
Nmap scan report for 192.168.0.12
Host is up (0.25s latency).
MAC Address: B8:27:EB:E0:08:FB (Raspberry Pi Foundation)
So, I can access my rpi remotely via ssh using the ip address 192.168.0.12. Please note that the default password for raspberry’s is raspberry so enter that when prompted:
$ ssh pi@192.168.0.12

pi@192.168.0.12's password:
Linux influxdb-historic 5.10.17-v7+ #1421 SMP Thu May 27 13:59:01 BST 2021 armv7l

The programs included with the Debian GNU/Linux system are free software;
the exact distribution terms for each program are described in the
individual files in /usr/share/doc/*/copyright.

Debian GNU/Linux comes with ABSOLUTELY NO WARRANTY, to the extent
permitted by applicable law.
Last login: Sat Jul 10 12:27:06 2021 from 192.168.0.28
Please note that I have logged in already prior to this so your output my be slightly different.
The first thing I did was to change the password from raspberry to a password of my choice. To
do this, type passwd and then type enter. You could also type passwd pi and then enter.
Follow the prompts to update the password.
After this is complete, I like to change the keyboard and language settings using
sudo raspi-config. Once all the settings are to my liking, I save and restart the pi:
sudo reboot. That will kick me off ssh and terminate my connection. After a minute or
so, I can re-connect via ssh pi@192.168.0.12, enter my new password and once logged in,
continue to update my packages from the repo with sudo apt update && sudo apt upgrade.
That’s it, for this section, next step will be downloading and configuring the postgresql
server.
Downloading and configuring the PostgreSQL Database Server
If you are un-familiar with databases, PostgreSQL is considered a RDBMS or
Relational Database Management System and is in a nutshell, an excellent place to store
relational data. In a corporate setting I was more familiar with Oracle, but PostgreSQL is essentially
the same thing for zero cost (which I would argue makes it better than Oracle ![]() ).
Anyway, moving on… Let’s install it:
).
Anyway, moving on… Let’s install it:
$ apt search postgresql

postgresql/stable,now 11+200+deb10u4 all
  object-relational SQL database (supported version)
The above command is used to search through the default system repos. There will be many items returned, but the package I would like to install is the supported version seen above.
$ sudo apt install postgresql
After this is complete, you can check to see if the database server is running:
$ systemctl status postgresql

● postgresql.service - PostgreSQL RDBMS
   Loaded: loaded (/lib/systemd/system/postgresql.service; enabled; vendor preset: enabled)
   Active: active (exited) since Sat 2021-07-10 12:50:01 CEST; 2h 57min ago
  Process: 7771 ExecStart=/bin/true (code=exited, status=0/SUCCESS)
 Main PID: 7771 (code=exited, status=0/SUCCESS)

Jul 10 12:50:01 influxdb-historic systemd[1]: Starting PostgreSQL RDBMS...
Jul 10 12:50:01 influxdb-historic systemd[1]: Started PostgreSQL RDBMS.
If I didn’t see this above, I would need to start the service myself. Also, if I would like the postgres database to start at boot, then I would need to enable it (assuming systemd):
$ sudo systemctl start postgresql
$ sudo systemctl enable postgresql
So, now postgreSQL is installed and running in the background. I can login into the database but need to switch to the postgres user first:
$ sudo su - postgres
Now to connect through CLI using the postgresql-client:
postgres@influxdb-historic:~$ psql
psql (11.12 (Raspbian 11.12-0+deb10u1))
Type "help" for help.

postgres=#
And it was a success. I typically create a new user at this point with a password. This user I am creating will be the owner of my historical data database.
postgres=# CREATE USER soitgoes511 WITH PASSWORD '<YOUR_PASSWORD_HERE>';
Finally, I want to create my database and change the ownership to the new user I created:
postgres=# CREATE DATABASE pulse_oximeter_historic;
postgres=# ALTER DATABASE pulse_oximeter_historic OWNER TO soitgoes511;
I can see my new database owned by yours truly:
postgres=# \l
                                          List of databases
          Name           |    Owner    | Encoding |   Collate   |    Ctype    |   Access privileges
-------------------------+-------------+----------+-------------+-------------+-----------------------
 postgres                | postgres    | UTF8     | en_US.UTF-8 | en_US.UTF-8 |
 pulse_oximeter_historic | soitgoes511 | UTF8     | en_US.UTF-8 | en_US.UTF-8 |
 template0               | postgres    | UTF8     | en_US.UTF-8 | en_US.UTF-8 | =c/postgres          +
                         |             |          |             |             | postgres=CTc/postgres
 template1               | postgres    | UTF8     | en_US.UTF-8 | en_US.UTF-8 | =c/postgres          +
                         |             |          |             |             | postgres=CTc/postgres
(4 rows)
Test database by writing to it remotely
Before testing, I need to make a a few changes to some of the postgreSQL configuration files. The loader I will be writing to populate this database with historical data will most likely run locally (on the pi), but I will be testing from my workstation. Therefore, I need to give authorization for my ip address to connect to the db and I need to the database to listen for more than the localhost. I will also be accessing the database to query data for modeling eventually and will need to ensure that I can access it:
$ sudo vim /etc/postgresql/11/main/postgresql.conf
First, I uncomment and change this line under connections and authentication:
listen_addresses = '*' # what IP address(es) to listen on;
Save and close. Then I can open up pg_hba.conf and give permissions to my workstation to connect:
$ sudo vim /etc/postgresql/11/main/pg_hba.conf

host    all             all             192.168.0.28/32         trust
Once this line is appended, I can restart my postgresql server and attempt to write some data to it:
$ sudo systemctl restart postgresql
From my workstation, I am using a jupyter-notebook and python 3 to first test the remote connection and then to load a dummy dataset I downloaded as a csv file off Kaggle. Here is a screenshot of those scripts and the output:
import psycopg2

conn = psycopg2.connect(
    host="192.168.0.12",
    database="pulse_oximeter_historic",
    user="soitgoes511",
    password="<YOUR_PSQL_PASSWORD>",
)

# create a cursor
cur = conn.cursor()

# execute a statement
print("PostgreSQL database version:")
cur.execute("SELECT version()")

# display the PostgreSQL database server version
db_version = cur.fetchone()
print(db_version)

# close the communication with the PostgreSQL
cur.close()
The connection was successful. OUTPUT:
PostgreSQL database version:
('PostgreSQL 11.12 (Raspbian 11.12-0+deb10u1) on arm-unknown-linux-gnueabihf, compiled by gcc (Raspbian 8.3.0-6+rpi1) 8.3.0, 32-bit',)
Let me attempt to write some data to the db:
from sqlalchemy import create_engine
import pandas as pd

engine = create_engine(
    "postgresql://soitgoes511:<YOUR_PSQL_PASSWORD>@192.168.0.12:5432/pulse_oximeter_historic"
)
df_best_sellers = pd.read_csv("/home/soitgoes/Kaggle/bestsellers_with_categories.csv")

df_best_sellers.to_sql("bestsellers", engine, if_exists="replace", index=False)

engine.dispose()
Finally, to sanity check the data made it there, let me query it:
from sqlalchemy import create_engine
import pandas as pd

engine = create_engine(
    "postgresql://soitgoes511:<YOUR_PSQL_PASSWORD>@192.168.0.12:5432/pulse_oximeter_historic"
)
query = """SELECT * FROM bestsellers LIMIT 5;"""

df = pd.read_sql(query, engine)

engine.dispose()

df.head()

It worked ![]() . That is a wrap for today. Part II as I mentioned will delve into actually extracting the relevant
data, transforming/shaping it and then loading it into my new postgres instance hosted on my very cheap and
wonderful rpi3b+. Thank you for reading.
. That is a wrap for today. Part II as I mentioned will delve into actually extracting the relevant
data, transforming/shaping it and then loading it into my new postgres instance hosted on my very cheap and
wonderful rpi3b+. Thank you for reading.
“I think, at a child’s birth, if a mother could ask a fairy godmother to endow it with the most useful gift, that gift would be curiosity.” ― Eleanor Roosevelt
Comments